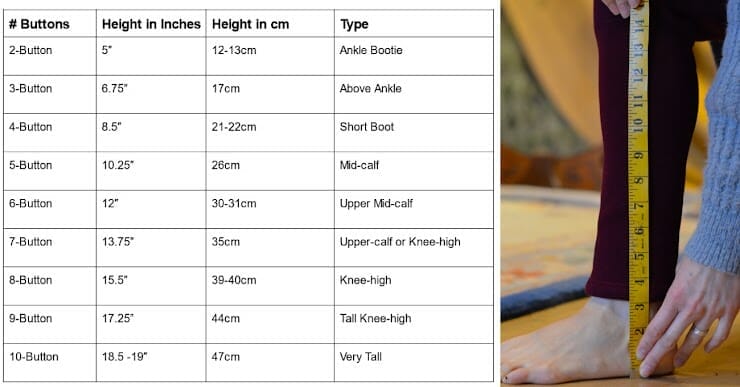
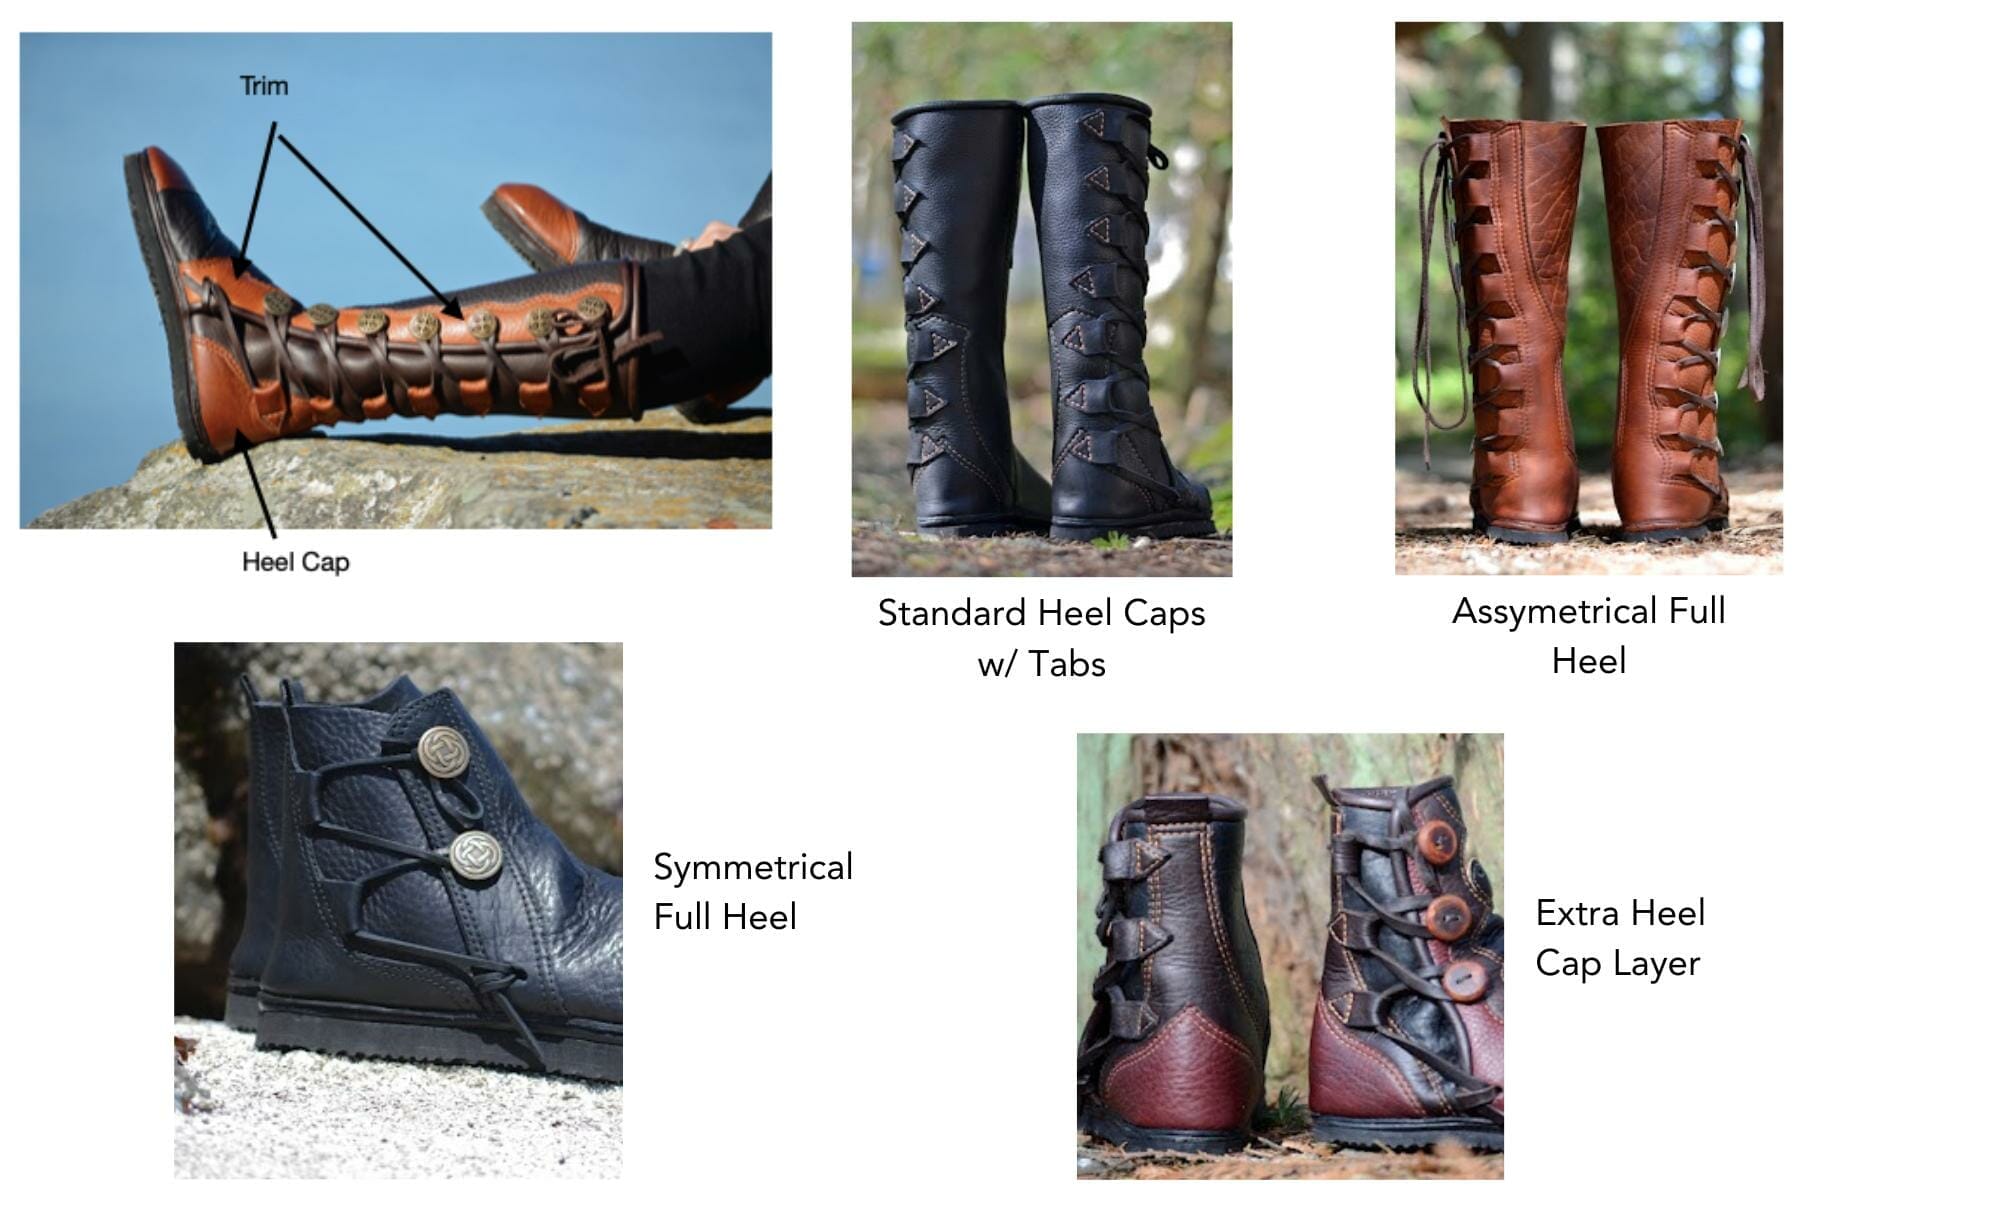
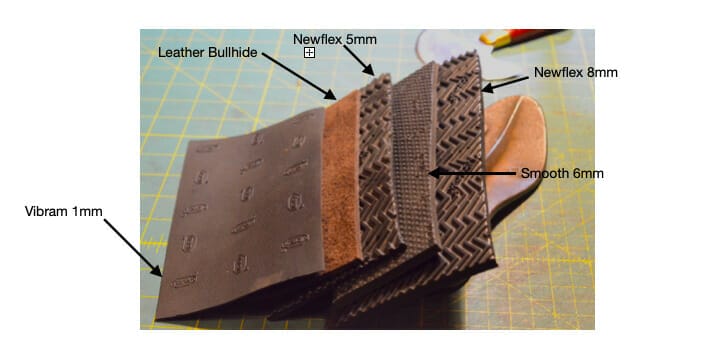
Guide to Filling Out The Custom Order Form

This page is intended as a guide or introduction to the options in our Custom Order Form.  You will receive the Order Form link by email upon paying your deposit.
To place an order, please view our Products Page and choose any of the Custom Moccasin-Boots listings, and pay the deposit to get the process started.

  1.  Height of Boots/How many Buttons?

The number of buttons you choose determines the  height of your boots.  If you want the most accuracy, the best way is to take a measurement of your leg:

  • Measure up the side of your leg from the floor to the height you want.
  • Check for the closest match  in the table below.
    eg.  I want these boots about 12” high, so I would choose a 6-button.   

Buttons/Height Table

2-buttons:  5         or   12-13cm

3-buttons:  6.75    or   17cm

4-buttons:  8.5      or   21-22cm

5-buttons:  10.25  or   26cm

6-buttons:  12        or   30-31cm

7-buttons:  13.75   or   35cm

8-buttons:  15.5     or   39-40cm

9-buttons:  17.25”   or   44cm

10-buttons:  18.5 -19″   or 47cm

2. Top Line

This refers to the shape of the top of the boot upper.  A straight top line is the standard on most boots, as well as Most of our listings.  The peaked top is pointed in the middle, whereas the side peak rises to a point on the outside.  * Please note that although piping is optional for a straight top boot, it is required for both peaked and side peak boots as the points need it to maintain their shape.  Here are examples:

Straight Top Line
Peaked Top Line
Side Peak Top Line

3.  Main Color of Moccasin

This is self explanatory, but if you are having difficulty making decisions about color combinations, I suggest starting by choosing your main color, and then go on to accents (trim & heel cap, extra trim layers, etc.).  If it’s too hard to mix & match, by all

means simply use one of the existing listings by naming the style in the comments box at the bottom of the form.  eg. “please make my boots exactly like the Beach & City boots, except with button #…”

The best way to see real examples of combinations is in the product photos and in the gallery photos.

https://www.soulpathshoes.com/artisan-shoes/moccasin-boots/

https://www.soulpathshoes.com/gallery/

4.  Bottom Trim & Heel Cap Color

The trim is the strip of extra leather under the buttons.  The heel cap is an extra layer to reinforce the heel area.  These are included in all

the boots, and the color can either be the same as the main color, or another color of your choice.  Again, you can see many examples in the gallery photos.

5.  Heel Cap Style

There are 3 main styles of heel cap:

  1. The standard heel cap is separate from the tabs.  The tabs are the leather loops with triangular stitching that the lace passes through. 
  2. The full heel cap goes right to the top of the boot, and the tabs are connected to the heel cap.
  3. The asymmetrical heel cap is off centre to allow for a hidden knife sheath and pocket, if this is wanted.  * Note: some customers like the asymmetrical heel cap style even without the knife pocket, as in the Kurt Russell style boots.
Standard Heel Caps & Tabs
Symmetrical Full Heel
Asymmetrical Full Heel
Wildcrafter's Boots w/knife.2
Asymmetrical with Hidden Knife & Pocket

6. Style of Trim

The style of trim refers to the design type for the trim layer. The best way to figure this out is by looking at the options below or at photos on our website and referring to a listing that you like. Or invent something new!

Basic trim styles are included in the base price; more complex trim designs are priced accordingly. The most popular styles are listed in the menu, with photos below to illustrate.  Any other style that is not here falls under “custom trim”, and you should describe what you want in the comments box, or by naming the listing that has the trim style you like(ie. “same trim as Magic Druid boots”). 

Straight Basic
Straight with Point
Jade Forest Style
Gentle Wave
Irregular Scallop
Natural Ragged Edge
Kurt Russel Style Wide Ragged Edge
Elven Flame

7.  Extra Trim Layer

As mentioned earlier, one layer of trim is always included.  An Extra  Layer of Trim is an option that adds depth and interest to the boots, and allows an extra color to be integrated if you wish.  Both trim layers can also be the  same color, which still adds depth and complexity to the design.

Vine & Leaf trim, with Redwood bottom layer & Chocolate top layer.
Magical Druid Design with both layers in Chocolate.

8.  Extra Trim Layer Color

If there is any doubt about which layer of trim is which color though, please specify this in the comments section below.

9.  Buttons

We recommend choosing the button style after making the other choices of design, such as the color combinations, trim styles etc.  This way the buttons will match or accent the designs and choices in the boots you are creating.

Here is our current selection of available buttons:

The antique brass D-rings for the Viking Boots style with D-Ring lacing system look like this:


10.  Outer Sole Options

The three main styles of outer soling that are most practical for the majority of uses are the Vibram Newflex 8mm, Vibram new flex 5 mm, and the Vibram ‘s smooth 6 mm.

The Newflex 8mm is what I recommend to most people because it has an ideal combination flexibility, cushioning, traction and durability while being very lightweight.

The Newflex 5 mm is exactly the same but a little bit more flexible and less durable.  I offered for those who prefer a thinner sole to to Be closer to the ground.

The 6mm Smooth is mainly for people who don’t want the tread pattern of the 8 mm.

The traditional leather sole is a great option for those who don’t want rubber, prefers something more traditional and natural, and I don’t mind doing more maintenance themselves. It is also much better suited to the forest and not concrete. It will not last as long as rubber, it will soak up water, and will delaminate much more easily.

The Minimalist Vibram  1 mm is only for those who want the absolute minimum because they are committed to minimalist footwear.

11.  Piping

Piping is a thin strip of  leather wrapped tightly over an otherwise exposed edge.

For our moccasins, this consists of the top line and the opening on the side where the buttons are.  Although piping provides added rigidity and protection to the bare edges, it is optional for straight top line boots.


Many customers choose to have it though as it gives a more finished look, especially for boots with an extra trim layer or fancier design, as it ties it all together neatly.

Peaked Top Line

However, if you choose a peaked top line or a side peak, piping is required to hold this shape.

For a more rugged look, such as the Kurt Russell Style Action Boots, or a simpler style such as the 2-button Black Booties, no piping is better suited.

Kurt Russell Style
2-Button Black Booties
Contrasting Piping Color
Piping Color Same as Main Color

* The half piping option is only for those ordering a cuff, as the cuff already covers the top line, and the half piping would then cover the edge down the side of the opening.

12. Piping Color

For a more subtle top line choose the piping color the same as the main

 color, as it will blend, yet will add contrast on the side opening, depending 

on the color of trim. If you prefer a top line with more contrast then choose one of the trim colors for

 piping instead of the main color (as in examples above).

13.  Cuff

The cuff is a bold feature that lends flair and adds an authentic look to Renaissance Boots, Pirate Boots, or any period costume.

14.  Toe Cap

The toe cap is an extra layer of leather covering the toe are of the boots.  It is mostly an aesthetic consideration, but also adds another layer of protection to this area.

For people who are wanting a more soft moccasin feel, it is better without; For those preferring a bit more rigidity and protection, The toe cap is a good choice.

* Please note:  As each boot is custom patterned and the sole made according to your foot tracing, there are often slight differences between the left and right toe box shape and toe cap.

No Toe Cap
With Toe Cap

16.  Arch Support

The arch support option is for those who prefer some support in this area.  If you are comfortable in bare feet, flat sandals, or other simple footwear, then recommend no arch support.
If you feel you need it, then we will custom fit your support and build it into your insole.  See photos below #17 for insole options.

17.  Insole Options

The insole is on the inside of the moccasin and can be removed to air out or to replace with a winter/summer version for different seasons.

The insole is made up of 3 layers:

– A thin base layer of dense orthotic cushion (3mm)

– A thicker layer or medium density orthotic quality cushioning (6mm)

– An optional arch support pad

  • A top layer of either smooth leather (for summer insoles) or quality wool felt (for winter insoles).


Insole Options

18. Custom Artwork or Specialty Designs

This is where the fun really begins!  The limit is your imagination…  choose a theme or symbol that has personal meaning for you and reflects your own uniqueness.  This is a co-creative process between you and the artisan.

You can also simply choose any design you see in the photo gallery, or use these as inspiration to have something new created.  In this case you can send us images or sketches and if more clarification is needed a phone consultation can be booked with Nathan, the artisan.  All custom work, including design time, research, or consultations, is billed at $75/hr.  
Please see the gallery for more examples.  Soul Path Shoes is where your dream boots come true.

Debbie's Dream Catcher Moccasins, in the making - 7
Dream Catcher Moccasins - 3